Purpose and a word before reading
This blog post is meant to give young developers a chance to quickly start with Unit testing. It’s not a replacement for the docs nor does it cover each and any aspect of the sometimes complex and emotional topic of unit testing.
It’s a long post, with around 8000 words. If you just read it, you may need one hour. If you work through the examples, I assume you need two hours of time.
All the phpunit code examples can be found on GitHub. Send in pull requests or create an issue when you spot an error or know, how to do it better.
Suggestions, Improvements, and any other comments are welcome!
Prerequisites
You should know how to write at least basic PHP (obviously). Classes and Objects should not confuse you.
You should use Composer as your dependency manager. Traditionally, PHP came late to the dependency manager party and some might say it is not necessary to have one. I disagree: you need Composer.
If you haven’t heard of Composer yet, I suggest learning about Composer first and then come back to this place. All serious frameworks can be loaded using Composer.
Why Unit testing?
Assume you fix a nasty bug in your code. Time passes, and weeks later the customer complains that exactly that nasty bug was reintroduced in one of the recent software versions. It’s a waste of time, energy, and money. You would need to fix things which were already fixed before. Your Boss might think you are an idiot, and your customer might consider moving to another developer shop. And it’s not even your fault, you might think. Because the customer always wants this crazy things. You certainly don’t have any time to really think through things and you might be always on the edge.
Does this sound familiar? We never have enough time. Why wasting even more time with writing unit tests?
How long does it take you?
Writing a test case for your PHP class might take as long as writing the target class itself. If you consider four hours for writing class (or let us say a new feature), it is safe to calculate another four hours for the test. Sometimes it is done faster, but test cases can become complex. If this is the case, it could eat up a lot of time. Also when you test data streams from unreliable sources. Then you could end up writing 100 lines of test code to just test 1 line of source code.
Is PHPUnit pricey?
Based on the estimation above, you could say unit testing doubles the cost of a feature.
On the other hand: how much time and money would you lose when you fix a bug two or three times? How do you value your reputation, when you introduce a version 1.0, and the first click of your customer triggered a nasty edge case you never considered?
As a self-employed developer, I cannot take the risk to spend more time in a feature than necessary. I cannot take the risk people think I am sloppy with my work.
When I test something manually, it costs me time too. A PHPUnit test runs in seconds. How long does a test setup on manual basis take? I guess when you release three versions of your software, you have already saved enough time to pay the unit test.
Upgrading your PHP version? If your test coverage is very high, you can be almost certain everything works like expected even with newer PHP versions.
Refactoring your code? How can you make sure your public interfaces are working exactly as before?
I don’t have the time and money to NOT write tests. Test cases actually save money.
Protecting you from regression bugs
Imagine for any problem you fix, you write a test case which covers that scenario. When you run your test automatically on each commit (I cover that later), you can be sure this problem won’t appear again anytime in the future. You would spot it, as soon as the tests run. Some of them even write you emails, so you can’t forget.
You might always introduce new bugs. It’s better to not deal with bugs which were already fixed. The new ones are enough. You could sit before the screen and test everything manually. But people are getting tired with repetitive tasks. Errors might happen even in the testing team.
Unit tests don’t lie. Sometimes Unit tests are getting on our nerves, but usually, they are right.
Keeping up your code quality
It is almost impossible to unit test a class of 1000 lines. It’s called Spaghetti code, if you haven’t heard it, and many people would suggest refactoring (rework) the class so it is shorter and can be read better. One class = one purpose. One method does one thing.
Knowing that you cannot easily test a class like this, what if you would aim for code which can be tested? While writing code, you need to have tested in mind. Ask yourself: “How can I test it, once my work is done?”
How would your code look like, if you would think like that? There are a lot of coding recommendations out there. People don’t speak about it because they want to look like experts (mostly). These recommendations help us, and sometimes you can think about Unit testing as your metric how well you designed your classes and methods.
Testdriven development (TDD)
There are people going a step further: they write the test case even before they start with their actual class. The purpose is clear: before you start coding like a maniac, you have to THINK about what you actually want to achieve. This thinking alone will make your code better. Over the time and with experience, it will become even better.
What to test?
Every new feature needs a test, and every bug fix needs one too. The exception would be something like a configuration error. These kind of errors are easy to spot, as they should come upon start time already. Everything which is real business logic should be tested as much as possible.
How many test cases do I need?
As many as possible :)
With testing, you need to do the right thing. My golden rule is to test at least 80% of your source code. With that, you are pretty safe already. However, you should aim for more. You most likely won’t reach 100%. Before wasting time with testing things which only happen on servers with corrupted memory, you should look into real world scenarios.
Core classes should be covered very well, treated in different conditions. It’s useful to not only cover the cases you’d expect or which are the “normal” way of operation.
You should also test what would happen when the user misses input, mixes up start and end time or due to unknown reasons you will receive null as an input. Don’t forget, we are now in a JavaScript world. Weird things can happen.
Don’t be a fanatic
Select the right tool for the job. Don’t follow all recommendations blindly, but think about them. Then make decisions on your own.
I like TDD pretty much, but I don’t use it all the time, to be honest. This is not necessarily bad. Sometimes it is simply easier to not start with a test but to write the test afterward. With some experience, you can decide. I recommend you to start with TDD first so you can see on your own what you gain. Once you know the rules, you can start to break it as you see fit.
In addition, there are some edge cases which I don’t test. Some people might disagree with me here, but I am pragmatic. I use my own brain to decide what needs to be covered and what not. Don’t get me wrong: laziness or the “no time” syndrome is not a factor to weight.
Don’t test crazy things
“This will never happen” - you have read that as a source code comment yet? If does not make sense to test, don’t test. In the Java world, you have to catch many exceptions. Sometimes they are coming from the server. In example, what if you can’t write to the output stream? The whole application will break anyway, there is often no need to test specifically for this issue. Do the right thing. Just don’t be lazy, and pretend it’s the right thing!
Don’t test third party code
You should not test functionality coming from a third party framework. You should chose your dependencies wisely. I always check if third-party code is already covered well with test cases. If this is not the case, I look somewhere else, contribute to the project or write it on my own. But don’t repeat tests other people already did, except you have good reasons to do so.
What is PHPUnit?
PHPUnit is a testing framework. It helps you to execute parts of your code and see what the outcome is. In an example, you could write a PHPUnit class (which is actually a so called “test case”) which makes an instance of a PostageCalculator and makes sure the calculations for each country is correct.
PHPUnit gives you an executable to run the tests, a way to organize your tests, and methods to test your outcome. What it not does is to make your code pretty and testable.
There is a lot of stuff in PHPUnit, more than I can cover in a single blog post. It’s worth to check out the PHPUnit docs, once you have mastered the basic unit testing steps.
Historic note: PHPUnit is actually a port of the popular JUnit project, written by some fantastic Java programmers.
Installing PHPUnit
The PHPUnit docs suggest to download it in a manual approach and install it globally. Depending on how many projects you work on in parallel, it might be OK for you. However, I face a lot of different projects from which I have to switch often, and they use different PHPUnit versions.
Lucky me, the creator of PHPUnit uploaded his work to Packagist as well, which is the central repository used by Composer.
Open your terminal/shell, cd to your project folder and type this:
$> composer require phpunit/phpunit --dev
This will add PHPUnit to the development requirements. You will not ship (and should not) PHPUnit to your production environment. Having it as a development requirement is fair enough.
You can check if it worked with calling the “binary” from Composers vendor folder like this:
$> vendor/bin/phpunit --version
PHPUnit 5.7.2 by Sebastian Bergmann and contributors.
Some IDEs like PHPStorm support running PHPUnit out of the box. It’s pretty comfortable actually, as you can select your test case with the mouse and execute it by click.
Ready? Let’s start with our first test case.
Writing a simple test case
Ok, now we are getting serious. Here is my Composer typical project layout:
├── src
│   ├── Application.php
│   ├── ...
├── tests
│   ├── assets
│   ├── bootstrap.php
│   ├── ApplicationTest.php
│   └── ...
You see, I separated the test code from the source code. I cannot know how you deploy (install) your code to your servers. But usually, you don’t push up the testing code. You test when you are happy you just deploy what is absolutely necessary to run your application. This is usually what is in the src folder.
Assets and Resources
In my tests folder, I got an assets folder. I use it to store specific resources I need to test. In an example, you want to test some specific data coming in from an API. You could put a JSON file here. Or you need some images for testing purposes. That’s the place. The assets folder is my invention. Other people might have other names, locations or whatever. In the Java world, it would be named “src/tests/resources” often.
I keep my testing resources in my tests folder, so I have everything at one place. Make your own, sane decision.
Bootstrap files
Did you see the bootstrap.php file? It’s more or less optional. You can use it for additional configuration. For now, you can leave it out, and you will run on the defaults.
But… using Composer you might need to load some classes. You should add something like this:
require __DIR__ . '/../vendor/autoload.php';
Composer knows how to load your dependencies and classes. It’s all in the autoload.php file. No autoload, no party. That’s why I said “more or less” optional. In many cases you’ll need it.
Another idea could be to define a constant:
if (!defined("TEST_ROOT")) {
    define("TEST_ROOT", realpath(__DIR__));
}
Or even some more advanced code, like implementing a necessary function to start a framework:
function get_test_app()
{
    $env = new Environment(Environment::TEST);
    $app = new Application($env);
    ...
Or configuring log4php.
In any case, the bootstrap file should be as short as possible.
You can have many bootstrap files actually and select it when starting PHPUnit. It would look like this:
$> vendor/bin/phpunit --bootstrap ./tests/bootstrap.php MyTestClass.php
With the bootstrap option, you can decide which file you use and make a decision on your environment and context.
Anatomy of a PHPUnit test
I wrote a simple class which looks like this:
namespace Grobmeier\PHPUnit;

class Simple
{
    private $number;

    public function __construct($number)
    {
        $this->number = $number;
    }

    public function divide($divisor)
    {
        if (empty($divisor)) {
            throw new \InvalidArgumentException("Divisor must be a number");
        }

        return $this->number / $divisor;
    }
}
You can find it on GitHub.
As you see, this class is really not a big player. It takes a number as a constructor argument which is stored as an object member. The method divide takes another argument, which is used as the divisor for object member number.
If the divisor is empty, we throw an exception. Empty in PHP means it is 0, null, false and so on. I could have written 0 specifically, but I like the empty() method pretty much.
Now here comes the more interesting part. In the tests folder, create another PHP class. Name it exactly like the class you want to test, just add the term “Test” on the end.
PHPUnit will identify your test case as test because it has the “Test” suffix. Naming the testing class like your test target helps you to keep an oversight on your tests. Exceptions are allowed if you see the need, but I recommend you to stick to the name of the original class as much as possible.
In addition, it is good practice to use the same namespace in the testing class as you use in the target class. It’s maybe not that a big deal with PHP, but it helps you to keep you well-organized . Both classes will remain in the same folder, you’ll never search for it. Second, in some languages like Java, there is a “package scope” of methods. PHP does not know it, but it could be introduced one day (I hope they do!). If there are no good reasons to not use the same namespace, you should simply do what almost everybody on the planet does.
Let’s look at our testing class:
namespace Grobmeier\PHPUnit;

class SimpleTest extends \PHPUnit_Framework_TestCase
{
    public function testDivide()
    {
        $simple = new Simple(10);
        $result = $simple->divide(2);

        $this->assertEquals(5, $result);
    }
}
On GitHub.
The first you’ll see is our test classes all extend from PHPUnit_Framework_TestCase.
If you are just starting with PHP you might be worried about the weird name of PHPUnit_Framework_TestCase. This is due to historical reasons. PHPUnit is a mature project, and before not long ago PHP didn’t know about namespaces. What people did back then was to create their own namespaces with long names and a lot of underscores. These days are gone, but a framework like PHPUnit can’t change that easily.
Please note: only classes extending from PHPUnit_Framework_TestCase will be executed.
Another naming convention. All methods you write in your testing class which needs to be executed by PHPUnit need to start with term “test”. At first, it might look ugly. But when your tests grow and become complex, you want to have the chance to define your own methods which are not touched by PHPUnit directly.
And if you want to be really working with good practices, you should name the testing method like the method you want to test. But in the real world, I found this is not always practical. I try to extend the method name to be a bit more descriptive
To sum the PHPUnit naming rules:
- Your testing class should be named like your target class, just ending with “Test”
- Use the same namespace for both classes
- Your test class needs to extend from PHPUnit_Framework_TestCase
- All test methods need to start with the word “test”
- Test method names should give you a clue what methods they test
What happens inside the test method?
We create an object, execute a method on it and finally check the result with the assertEquals method. “assertEquals” is provided by PHPUnit_Framework_TestCase. The first argument you give is what you would expect. The second argument is the actual result of your class.
There are a lot of assertion methods in PHPUnit. In daily life you most likely only need a few of them, like assertEquals, but it’s worth to looking through them from time to time on the official documentation, as they can save you a lot of time.
Running and interpreting PHPUnit
Time to execute! Head over to your command line and do that:
$> vendor/bin/phpunit tests
PHPUnit 5.7.2 by Sebastian Bergmann and contributors.

.                                                                   1 / 1 (100%)

Time: 37 ms, Memory: 3.50MB

OK (1 test, 1 assertion)
I am running this from my projects root folder. I execute the Composer installed binary with the folder in which my tests reside. For the sake of completeness, I got a bootstrap.php in the tests folder. It’s picked up by default.
Trouble? If you are just setting up your project and run into trouble, try to do a composer install. Sometimes
just the autoloader file is missing or not up to date.
In the output above you should now be able to confirm there was one test running (SimpleTest) with one assertion (it’s the “$this->assertEquals” call). All went successfully.
Let’s do a counter check. When I modify the assertEquals so it’s not longer correct, a PHPUnit run would look like this:
vendor/bin/phpunit tests
PHPUnit 5.7.2 by Sebastian Bergmann and contributors.

F                                                                   1 / 1 (100%)

Time: 36 ms, Memory: 3.75MB

There was 1 failure:

1) Grobmeier\PHPUnit\SimpleTest::testDivide
Failed asserting that 5 matches expected 7.

/phpunit-examples.git/tests/SimpleTest.php:11

FAILURES!
Tests: 1, Assertions: 1, Failures: 1.
PHPUnit was so nice to tell us there is a failure in a test. A failure means, we had some kind of assertion which was not returning what we would expect. Also, it tells us exactly in which line the assertion broke. That’s pretty cool to debug our code.
There is something else than just failures. It’s an Error. PHPUnit Errors are different to failures. A failure means, the operations completed somehow normally, but the result is unexpected. But errors mean something hit the fan and you are in trouble.
Imagine we would have the following code:
public function divide($divisor)
{
    throw new \Exception();
}
Obviously, this doesn’t work well for our project. The result in PHPUnit would look like:
vendor/bin/phpunit tests
PHPUnit 5.7.2 by Sebastian Bergmann and contributors.

E                                                                   1 / 1 (100%)

Time: 29 ms, Memory: 3.25MB

There was 1 error:

1) Grobmeier\PHPUnit\SimpleTest::testDivide
Exception:

/phpunit-examples.git/src/Simple.php:19
/phpunit-examples.git/tests/SimpleTest.php:9

ERRORS!
Tests: 1, Assertions: 0, Errors: 1.
In both cases you have to investigate. But sometimes it’s worth knowing the difference.
Testing exceptions
We now know our class works when we use the right arguments. But in our code, we explicitly mentioned this:
public function divide($divisor)
{
    if (empty($divisor)) {
        throw new \InvalidArgumentException("Divisor must be a number");
    }
    ...
If the divisor is empty, we want to throw an exception with a specific message and not to rely on whatever the language would do in this case. We expect an exception, and if you want to sleep well in future, we need to test this exception case as well.
How to test exceptions?
We are now moving out of the usual PHP paths, as PHPUnit uses so-called annotations. The problem is, annotations are not supported by the PHP programming language (unfortunately). PHPUnit solves this with using annotations in the phpdocs (as a comment). Actually, there is a programmatic way too, but annotations are great for this case.
Purists might find this pretty evil. Normally I would agree. Annotations need to be native, not comments. But PHPUnit is a bit different. It’s testing code. And for that, I want to have only testing code in my testing method, nothing else.
Test code is not necessarily nice or elegant, it should simply put some pressure on the the nuts and bolts which keep our applications running.
It’s looking like this:
/**
 * @expectedException \InvalidArgumentException
 */
public function testDivideWithException()
{
    $simple = new Simple(10);
    $simple->divide(0);
}
The magic is done with the @exepectedException annotation. PHPUnit recognizes, we would expect an Exception here, with the type InvalidArgumentException. If it’s not thrown, PHPUnit treats it as a failure.
You know how this test will look if it passes, but if it fails it would look like this:
2) Grobmeier\PHPUnit\SimpleTest::testDivideWithException
Failed asserting that exception of type "\InvalidArgumentException" is thrown.
Neat, huh?
Well, if you are REALLY not happy with using an annotation, you can actually write this directly into your test case. It would look like this:
public function testException()
{
    $this->expectException(InvalidArgumentException::class);

    // ... test code
}
Going a step further, you can read in the docs about how to test exception codes, exception messages and so on.
All in all, this kind of test is pretty awesome already. PHPUnit has even more annotations waiting for you. Not all are as useful as this one. But some can become vital to your project.
More on assertions
As mentioned already, assertions are the one thing you should know in and out. We learned already about:
$this->assertEquals($expected, $actual);
It tests on a single value.
But there is more. Even more, than I can cover in a single blog post. There are checks on files, arrays, XML and so on. Here are some I use frequently.
Assuming the $assertions object would return null in the method getNull:
$this->assertNull($assertions->getNull());
You can use assertNull to check on null values. Or assertNotNull to check on not null values. This is shorter than assertEquals(null, $value). And better for your eyes (at least mine).
Checking true values
$this->assertTrue($assertions->getTrue());
Of course, there is a counterpart for checking on false values as well.
Asserting arrays
It’s getting more interesting when checking arrays. Let’s say the getFruits method would look like this:
public function getFruits()
{
    return [
        'peach' => 'sweet',
        'melon' => 'watery',
        'apple' => 'sour',
        'banana' => 'amazing'
    ];
}
And now you want to make sure that at least an apple is there! I like bananas more, but sometimes the apple rules, especially when I try to lose weight :-( This assert checks if there is a specific key in the array:
$this->assertArrayHasKey('apple', $assertions->getFruits());
Valuable, but not very precise. You can check if there is a subset of the result, at least:
$this->assertArraySubset( [
        'melon' => 'watery',
        'apple' => 'sour'
], $assertions->getFruits());
Nice. However, we have four fruits, not just two. Maybe we don’t know which ones, but we need to make sure it’s always four. assertCount helps:
$this->assertCount(4, $assertions->getFruits());
Nice. But if you really want to nail it down to the floor, you just need to equals everything. Now we are back to our good old friend, assertEquals. Given the getFruits() method from above, we could compare it with this assertion:
$this->assertEquals([
    'apple' => 'sour',
    'peach' => 'sweet',
    'melon' => 'watery',
    'banana' => 'amazing'
], $assertions->getFruits());
Please note, the above expected order is different to the order from the getFruits method. In this case it works well, but depending on your case you might need to sort() before you assert.
Testing JSON
That’s great. For the frontend, we need JSON nowadays. Let us check if our generated JSON looks like we would expect it with assertJson
$this->assertJson('{"peach":"sweet","melon":"watery","apple":"sour","banana":"amazing"}', $assertions->getJsonFruits());
Now you have a great toolset in hand to write a lot of tests already. Congratulations if you made it that far. Now we start with the more advanced testing.
Fixtures: setUp and Teardown
PHPUnit can be already powerful with what we know. If you read on, it’s getting even more comfortable and help you to build up nicely organized tests.
Say, you have a list of objects on which you want to perform several tests. It would be possible to create that list inside each and any test case. But the “don’t repeat yourself” principle says we should do it better. The next idea would be to write a separate method which constructs all we need. That’s much better actually, but you would have to call this method for each test method. Some people might say, this is unnecessary. And furthermore, test data construction is not part of the actual test, so it should be left out of the code.
If you think like that, you will love setUp and tearDown. If you implement two methods with that name, PHPUnit will treat them special. Actually the setUp() method will be called before EACH test method run, and tearDown() will be called AFTER a method was running.
Look at this code which highlights the use of setUp:
private $names;

public function setUp()
{
    $this->names = [
        'Christian',
        'Nicole',
        'Ben'
    ];
}

public function testMethod1()
{
    $this->assertCount(3, $this->names);
    $this->names[] = 'Surprise!';
    $this->assertCount(4, $this->names);
}

public function testMethod2()
{
    $this->assertCount(3, $this->names);
    array_splice($this->names, 1, 1);
    $this->assertCount(2, $this->names);
}
In this test case, we maintain some kind of a state. It’s the $names variable. Please note, states are always a bit dangerous and need to decide case on case if you really need it. In terms of test cases, I would make sure you have a test class for testing one thing and maintain only as little state as necessary. Don’t mix up various states per test case.
That warning aside, we could now populate the $names list for each and any test method call. That is being done in the setUp method. Before something happens, setUp makes sure we have three names on the list.
You can assert that before you run it. You should not assert this in real life actually, as one testing principle is to not test what’s not yours (unless you code medical devices maybe).
In test method 1 we see there are three names, then we add one and assert if the addition worked. In test method 2 we assert if there is again only three names. Which in fact means, the setUp method prepared everything for us, which it did.
setUp() is very helpful. tearDown is also nice, but most often not used that much as setUp. It’s the counterpart to setUp and cleans up “things”. Things, that’s maybe resource access.
Imagine you want to open some resource in setUp(), and close it down in tearDown().
private $resource = false;

public function setUp()
{
    ...

    if (!$this->resource) {
        $this->resource = true;
        print_r("Resource opened" . PHP_EOL);
    }
}

public function tearDown()
{
    if ($this->resource) {
        $this->resource = false;
        print_r("Resource closed" . PHP_EOL);
    }
}
On GitHub.
Before I explain, another remark on good test cases: you should not write something to console in your test cases. Writing to the console is usually a sign of a developer being too lazy to write asserts! But “manual assertions” by reading the console output is against the idea of automatic testing, so don’t do it. I left it here so you can see when PHPUnit calls what.
This is what I see when I run my test case:
PHPUnit 5.7.2 by Sebastian Bergmann and contributors.

Resource opened
Resource closed
Resource opened
Resource closed


Time: 24 ms, Memory: 3.50MB
The code opens a resource, if it’s not open, before each test call. And it will be closed once the test method is run. You need to decide if this is efficient or not or if you should move on to other ideas.
There is one more thing worth to know. Similar to setUp and tearDown, there are two methods which do exactly the same, but on class level.
The methods are called setUpBeforeClass() and tearDownAfterClass(). setUpBeforeClass will run before the first test method in a test class is executed, and tearDownAfterClass will be called after the last test method was executed. In some cases, you might decide this is a better place to open or close resources.
You should think about making your test cases as atomar and small as possible. They will become complex on their own of the time, you don’t need to add anything to it.
Also, you should write your test methods and test cases in a way they are not depending on each other. Everything needs to test one thing and should be able to run separately from everything else. setUpBeforeClass() is often abused to create one single data pool which is manipulated by many test methods. It often ends up that you cannot see what test cases are failing exactly, because if the first fails, everything goes to hell. You might overlook some important clues to get your issues fixed quickly.
Preparing fixed data before a test run is called writing a “Fixture”.
If setUp() becomes messy and unreadable, you should look into PHPUnits DataProviders. DataProviders can help you to easily define big fields of data on which your test case will run.
Mock testing
Congratulations for making it that far. You have managed the basics of PHPUnit, and from now on you should be able to write some crazy stuff by reading the docs on your own. However, Unit testing does not mean PHPUnit alone. Starting with Mocks, we enter the advanced testing. The following sections of this text will enable you to make the most out of your tests.
We start with writing Mocks.
In a real world scenario, we have to deal with some complex objects sometimes. Some of them are very hard to create, some take a long time. While we might need to test them properly, we don’t need to recreate them all over and over. In some cases, it is simply not possible to properly create the objects, because they are backed by third party services.
Back then, developers “mocked” these third party services manually. They would create some interfaces here and there and implement some code to somehow act as they think the third party would act. Service by service. Lot’s of work.
Luckily, we can save a lot of this work by using the Mockery framework. It’s meant to be used together with PHPUnit. It will save you the time to think about the good and bad about Mocking and gives you a lot of approaches at hand with their excellent docs.
Installing Mockery
Add the following to the require-dev part of your composer.json:
"mockery/mockery": "dev-master"
then write “composer install” to update your dependencies. At least, this is what the Mockery people suggest. With suggesting dev-master as your version, they also promise to keep their branch very stable. I don’t trust anyone when it comes to my dependencies, so I prefer to nail down the version.
My composer dependencies for this blog post look like this:
"require-dev": {
    "phpunit/phpunit": "^5.7",
    "mockery/mockery": "0.9.6"
},
You decide to nail down your versions like me or trust the Mockery folks to not break things (Hint: I might be paranoid).
Testing a service class with Mockery
Now let’s get started with a simple example. Assume we want to use this service class:
class SimpleService
{
    /** @var Simple $simple */
    private $simple;

    public function __construct(Simple $simple)
    {
        $this->simple = $simple;
    }

    public function dividingService($arg)
    {
        return $this->simple->divide($arg);
    }
}
On GitHub.
The Simple::class was defined earlier in this blog post. It only provides only one method which divides the constructor argument through the method argument.
If we want to avoid to use the actual Simple, because it will call the result from some kind of web service, we need to mock it. Luckily we inject the Simple dependency from outside, so it’s pretty easy.
Here is what we would write in our test case:
public function testDivide()
{
    $mock = \Mockery::mock(Simple::class);
    $mock->shouldReceive('divide')->andReturn(5);

    $service = new SimpleService($mock);
    $result = $service->dividingService(10);
    $this->assertEquals(5, $result);
}
On GitHub.
First, we ask Mockery to create a new Mock based on the Simple::class. What happens is, Mockery will create an object with (almost) the same interface than our original class has. The methods are not doing anything useful yet, just the method signatures are available.
In the second line, we tell Mockery our expectation and what it should do. The Simple object should receive a call to the divide method. When this is the case, Mockery should return a 5.
The rest is plain testing code. We create the service and inject our Mock, call the service methods and compare the result.
While this test case does not make sense in the real world (everybody would create the Simple class directly), it makes a lot of sense in other cases. You could Mock your DAO classes like this, so you don’t need a database in your test cases.
That being said, having that is very useful. But please keep in mind, that Mocks are never the real thing. As long as you didn’t test the real thing, you didn’t test it. Still, this is powerful for testing some logics in service classes.
Asserting arguments
Mockery is powerful, and while I don’t aim to explain everything, there are a couple of things I would like to show here.
Assume your service class would do a couple of calculations and then save something to a database. For sure you want to know what might be saved there. If you are using a DAO, you are on the lucky side of life (in case you don’t know: a DAO is basically a specialized class which does nothing else than reading and manipulating your data. Search for Data Access Object).
$mock
    ->shouldReceive('addPerson')
    ->once()
    ->withArgs(function($person) {
        $this->assertTrue(Mockery::type(Person::class)->match($person));
        $this->assertEquals('Grobmeier', $listing->name);
        return true;
    })
    ->andReturn(true);
The example above verifies a person being stored in the database. The Mock should receive a call to the “addPerson” method. Here is the first change: it should receive it only once. Otherwise, we would have duplicate persons stored, which is of course wrong. The methods twice() or times() (for multiple calls) are also available.
Now we can check on the argument, with the “withArgs” method. This method takes a callback, where it injects the arguments given. Now, as I have access to the argument itself I can write tests as much as I can!
The first assertion is to see if the $person argument is actually of the type Person. You could do this with plain PHP as well, but Mockery has these nice little methods at hand which makes everything readable. Then I check the name (boring) and return true when my tests succeeded. The final call is to tell Mockery, what the “addPerson” method should return after it’s called.
The whole test is about testing the service class. Of course, we cannot tell anything about the database class, but at least the service will work like expected.
Mocking the Database/PDO
I mostly use a little neat database framework called Phormium. It’s minimalist, and that’s why I like it. At some time, I had to mock the connection and test on the actual PDO calls made by the framework.
Please note, mocking everything database today is maybe not the best thing to do. Today we have a lot of possibilities to test against a real database, so we might be able to avoid mocking here. However, sometimes it’s just quicker, better, more stable.
First I had to mock the Connection class, which wraps the PDO layer in Phormium:
$mockConn = \Mockery::mock(Connection::class);
$mockConn->shouldReceive('inTransaction')
    ->once()
    ->andReturn(false);
I also made sure, the “inTransaction” method returns false. It’s some Phormium internals to check on that.
Then I needed to test on a select being done (or not):
$person = new Person('Christian');
$person->weight = 80; // this is the weight I work hard for! Can't lie to you!

$mockConn->shouldReceive('preparedQuery')->once()
  ->with('/^SELECT /', [$id], \PDO::FETCH_CLASS, Person::class)
  ->andReturn([$person]);
A call on Phormiums Connection::preparedQuery will check, if the SQL starts with “SELECT”, on the params, the PDO fetch class and what class I want to fetch. If this is called, Mockery will return the person created before.
A lot of things can be done with Mockery. But there are a couple of things which can make Mocking hard or even impossible.
In an example, static methods cannot be mocked. A static method is always there and it’s on class level. You cannot replace it, even when you create an object. Mockery got a solution to interfere the class loading mechanism, but this is far from being nice and clean. Static methods nowadays should always be critically acclaimed. There might not be many places where static things actually make sense.
Similar to final. Final is final, period. You should have good reasons to make something final at all, but if you do, you might face problems with your Mocks.
All in all, if you are using a modern programming paradigm and think in objects (rather than static and final) you should have some powerful tool at hands.
I already mentioned: only what you really test, is really tested. If you mocked your database connections like I did, you mocked them. Luckily there is a solution for that. But before we do, we should look into automatically running our unit tests.
Continuous Integration (running tests automatically)
Continuous Integration (CI) means you are testing immediately when you are done coding. In the real world it would mean: at the time you push something to GitHub (or whatever), it will be tested without you triggering it. Ideally, you have run your tests locally before you push. But the idea is, to not trust anyone, and run the tests, whatever happens.
With CI came a lot of opportunities. Once the tests passed successfully, some people also deploy it automatically. Why not? The feature is done, we hope it’s covered in full by our testing code… let’s rock. This is called “Continuous Deployment” and saves a lot of time. Some companies manage to roll out new releases hundred times a day.
For that to happen, you need a CI tool first. A popular but old school one is Jenkins. I would not recommend using Jenkins directly, except you have the man power and a good need to keep everything on your own servers. A single man show like me or smaller companies should look at the managed hostings available.
One CI server I like is CircleCI. Another popular choice is Travis. I haven’t compared them in detail, but I believe they are similar in features. I went for Circle because they have a great pricing for starters and they are super nice people. The choice is yours.
Here is how CircleCI looks when I commit something to my repository:
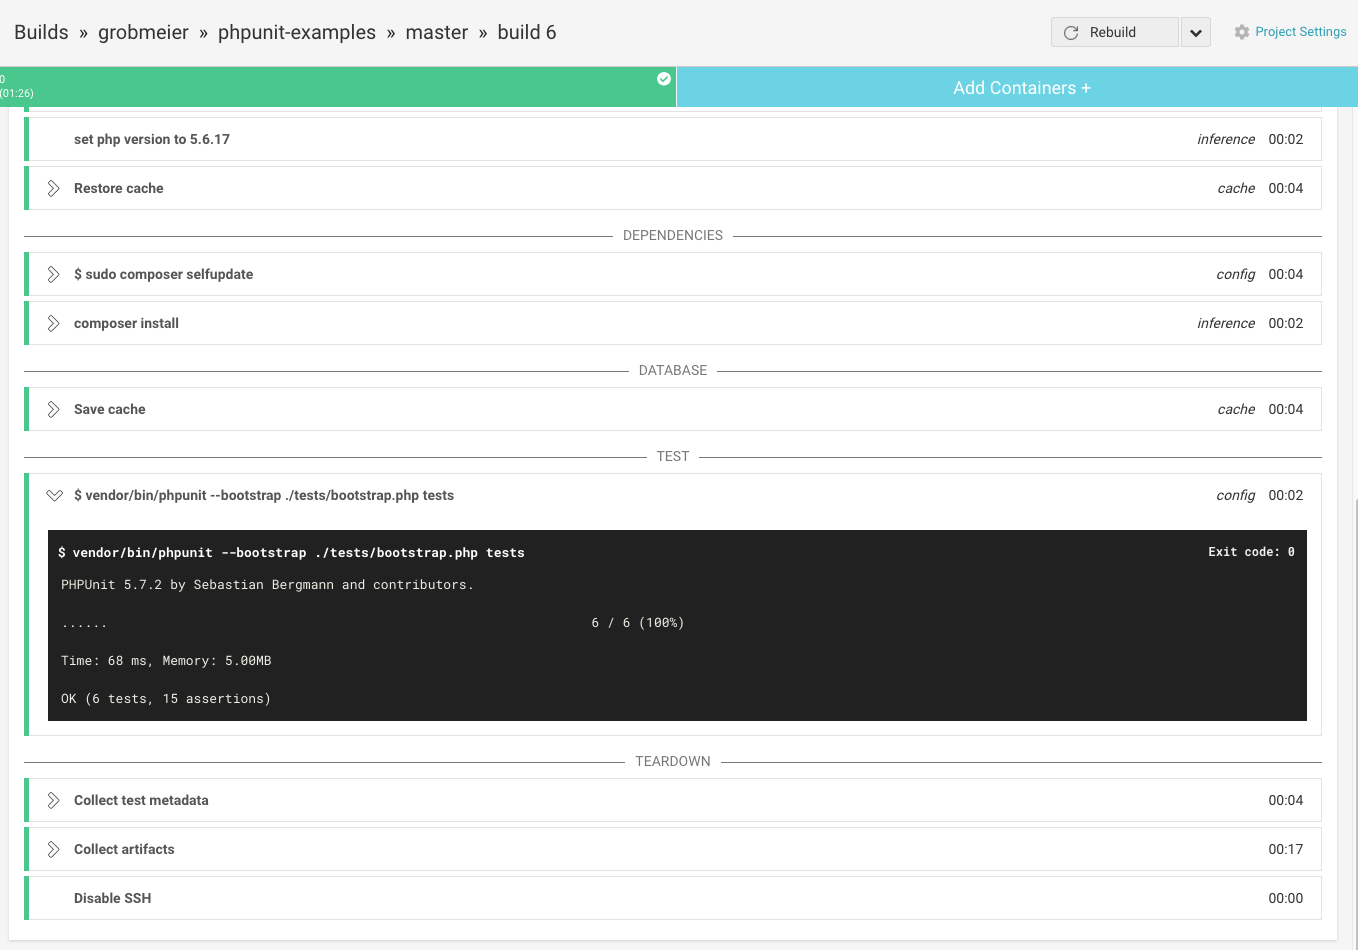
The only thing you have to do is, to push your Code to GitHub or Bitbucket, open an account with Circle and choose from a list of projects Circle provides. Hit “build” and usually, you are done.
In some cases, you might need to have some extension. In this case, you’ll find Circle is highly configurable using a file called circle.yml. Just put this file into your root source folder and you can override a lot of things.
This is how my Circle.yml looks like:
machine:
  php:
    version: 5.6.17
dependencies:
  pre:
    - sudo composer selfupdate
  cache_directories:
    - "vendor"
test:
  override:
    - vendor/bin/phpunit --bootstrap ./tests/bootstrap.php tests
The “machine” part configures my PHP version. There is a list of version Circle provides. Usually, it’s the versions which come with Ubuntu by default. If not, you can even configure circle to build it’s own stuff, but that would be pretty… tough.
However, it’s also pretty easy to add a few shell commands as “dependency”. In my case, I wanted composer to be up to date for my tests. I added the self-update command to the pre-section.
Also, the cache_directories is a setting which I don’t miss. It can speed up your tests significantly, by caching your dependencies from composer. Feel free to cache a few other folders as well, if necessary.
Finally, I wanted to nail down my test command. That’s why I put something in the “test” section, using the “override” command.
The docs are pretty exhaustive, and you can do a lot of things with Circle. Due to their great pricing for small teams they are a great choice for many.
One of their amazing features is, they let you set up a database against which you can test. Read on.
Testing the almost real world
I usually call it “Integration test”, but I learned it’s not precise to say so. What I mean is, to test the full integration of code and database: all components involved. When I started to work as a programmer, integration testing was a hard job. We usually had only a handful test cases just to see if everything “connected” well before we put it into production.
Today that kind of testing became a lot easier, thanks to tools like CircleCI. It’s almost pain free to set up a database on the testing VM and runs a couple of tests. Of course, testing with that approach eats up some time. But if you ask me, Mock testing is only one part of the job, there must be a real database test too.
Make it work on your local box
If you need a database, you have to install one. For this blog, I am using MySQL and you should install it, or another database of your choice. I created a database called “phpunittest”.
Then I create a user like this:
CREATE USER 'ubuntu'@'%' IDENTIFIED BY '';
I already know, this is CircleCIs default user for testing. So I am using it at home too, to keep things simple. Then I gave the new user some rights on my database, like that:
GRANT Create Routine, Insert, Select, Drop, Delete, Index, Create, Update, Alter ON `phpunittest`.* TO `ubuntu`@`%`;
FLUSH PRIVILEGES;
So far to the MySQL internals. I really don’t like all the admin stuff, but luckily testing databases should not have confidential data and are only temporary. Sloppy rights are OK.
Next is: we need to populate the database. I created three scripts: one to create the tables, one to populate some testing data, and finally one to delete all the junk I did.
Create in tests/assets/create.sql:
DROP TABLE IF EXISTS `persons`;
CREATE TABLE `persons` (
    `id` int NOT NULL,
    `email` varchar(100),
    `nick` varchar(100),
    PRIMARY KEY (`id`)
);
It’s a simple table to hold some kind of persons. You may want to tweak it, like I didn’t use auto increment.
Next comes some data in tests/assets/data.sql:
insert into `persons` ( `email`, `id`, `nick`) values ( 'test1@example.com', '1', 'Test 1');
insert into `persons` ( `email`, `id`, `nick`) values ( 'test2@example.com', '2', 'Test 2');
This is my basic testing data. Consider to add data from within the test cases, as maintaining the data in such a file like data.sql can be confusing and hard. I usually only put absolutely necessary data here, without which the application could not run at all.
Finally, some cleanup script:
set foreign_key_checks=0;
TRUNCATE `persons`;
set foreign_key_checks=1;
Foreign keys are not important to me when cleaning up. So I disabled them, deleted everything, and enabled them again.
Now I got a couple of commands which need to be executed before test runs. To make sure it is happening, I created myself a shell script. It’s optional, but I recommend to do something similar, so your steps are repeatable and your colleagues keep their mental sanity. Script everything!
Here is run-tests.sh:
#!/usr/bin/env bash

mysql -u ubuntu -D phpunittest < tests/assets/teardown.sql
mysql -u ubuntu -D phpunittest < tests/assets/create.sql
mysql -u ubuntu -D phpunittest < tests/assets/data.sql

vendor/bin/phpunit tests
Now before my tests run, my SQL is executed.
We can confirm that by finally adding some database testing code. As mentioned, I am a huge fan of Phormium. I added this to my dependencies first:
"require": {
    "phormium/phormium": "~0.8.0"
},
and then hit composer install. Phormium is pouring in :-)
Now here comes some application code. First, here is my model which is mapped by Phormium.
class Person extends \Phormium\Model
{
    protected static $_meta = array(
        'database' => 'phpunittest',
        'table' => 'persons',
        'pk' => 'id'
    );

    public $id;
    public $nick;
    public $email;
}
On GitHub.
The _meta stuff is only for Phormium. It then knows what database and table I meant, and I even take care the primary key is known to identify the record for updates and deletes. Then there are just some public fields like they are named in the database. It’s Phormium magic, but you can use your own thing here.
class App
{
    private $config = ["mysql:host=127.0.0.1:3306;dbname=phpunittest", "ubuntu", ""];

    public function __construct(array $config = null)
    {
        if (!empty($dsn)) {
            $this->config = $config;
        }

        list($dsn, $user, $pass) = $this->config;
        \Phormium\DB::configure([
            'databases' => [
                'phpunittest' => [
                    'dsn' => $dsn,
                    'username' => $user,
                    'password' => $pass
                ]
            ]
        ]);
    }

    public function readPersons()
    {
        return Person::objects()->fetch();
    }
}
On GitHub
A bunch of code, but don’t worry. If you don’t want to use Phormium, you don’t need to understand it in full. What I am doing is to construct the database connection inside the constructor. I have some defaults for the database connectivity. It is again a connection to 127.0.0.1, my database name and user and password. The method “readPersons” asks Phormium to return everything in the persons table.
So far so good. Now how to test it? It’s actually not complicated. Here is the test case:
class AppTest extends \PHPUnit_Framework_TestCase
{
    public function testReadPersons()
    {
        $app = new App();
        $this->assertCount(2, $app->readPersons());
    }
}
On GitHub
Just make sure to execute it with loading your data!
./run-tests.sh
PHPUnit 5.7.3 by Sebastian Bergmann and contributors.

.......                                                             7 / 7 (100%)

Time: 80 ms, Memory: 6.25MB

OK (7 tests, 16 assertions)
Now we got it running on our local box. I guess it’s time to make sure it’s running on the CircleCI box as well.
Running database tests on CircleCI
CircleCI supports various database out of the box. Among them is PostgreSQL, MongoDB, Couchbase and so on. Of course, MySQL is available too.
By default, CircleCI creates a schema called “circle_test”. It’s nice of Circle to do that, but if you have plenty of projects you might want to have different names for your schemas. Otherwise, running the tests on your local machine can become frustrating.
To make sure the necessary schema called “phpunittest” is available, we need another SQL script. I put it into tests/assets/setup-db.sql.
CREATE DATABASE IF NOT EXISTS phpunittest;
That’s no real black magic. The script just looks if there is a schema called phpunittest, and if not, it’s creating one. We don’t necessary need that for our local tests, because I don’t delete testing schemas from my machine. If you feel otherwise about that, you need to adjust your run-tests.sh script.
To make this thing work, you need to know the Circle VM provides a default user for databases. Its username is “ubuntu” and the password is empty. That’s why we created such a user for our local testing machine. You could create additional users within your testing script, but for me, it was too much of a hassle.
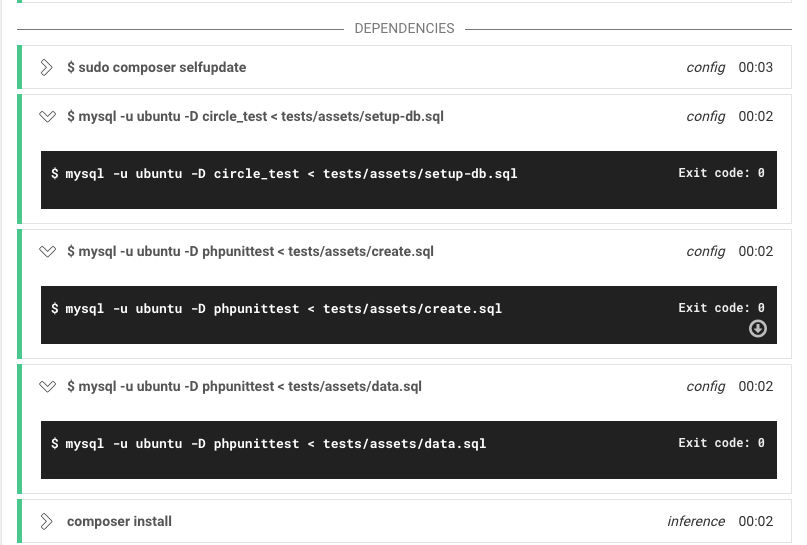
To execute these scripts, we again need to adjust the circle.yml file.
Remember when we added a command to self-update composer? It’s in the same section:
dependencies:
  pre:
    - sudo composer selfupdate

    - mysql -u ubuntu -D circle_test < tests/assets/setup-db.sql
    - mysql -u ubuntu -D phpunittest < tests/assets/create.sql
    - mysql -u ubuntu -D phpunittest < tests/assets/data.sql
I use the MySQL directly to pipe in my scripts. As the only confusing thing here, the setup-db.sql script is being piped into the default schema. The reason is, I need to select a database initially, otherwise, the command won’t work. So my choice was to use circle_test because I am sure it’s always there. Even when I mess up something, nothing too bad will happen. I am not so sure when using MySQL information schema or something like that.
That’s it, my tests completed successfully. To be honest, it’s always a little bit of trial and error to actually make something like this work, but it’s certainly worth the effort. CircleCIs docs are mostly excellent and their support and community are usually helpful.
Code Coverage
There is one last thing I need to mention for our little roundtrip of testing. It’s Code Coverage. Initially, I said 100% would be amazing, but in the real world, you almost never get that coverage. But how can you know, how much you covered already?
Google for “Code Coverage”, and you have your answer. There are plenty of tools for it. Even your IDE might support it out of the box. How the coverage is counted is a bit different from tool to tool, so you should look at several and commit to one.
For PHPUnit, you’ll need xdebug to be enabled on your system. You can find out if you have it like this:
$> php -ini|grep 'xdebug support'
xdebug support => enabled
If it’s not there, you’ll need to install xdebug it first.
When this is done, the rest is easy. Just use a command like this:
vendor/bin/phpunit tests --coverage-html target --whitelist=tests
There is an additional parameter called –coverage-html. It takes the target folder as a parameter. Additionally, you require –whitelist, which tells PHPUnit what to include in your coverage.
In the target folder, you will see a generated static website showing you the required numbers.

As you see above, we covered most of our code already! The database package could be better. A few clicks more I see what’s the problem.
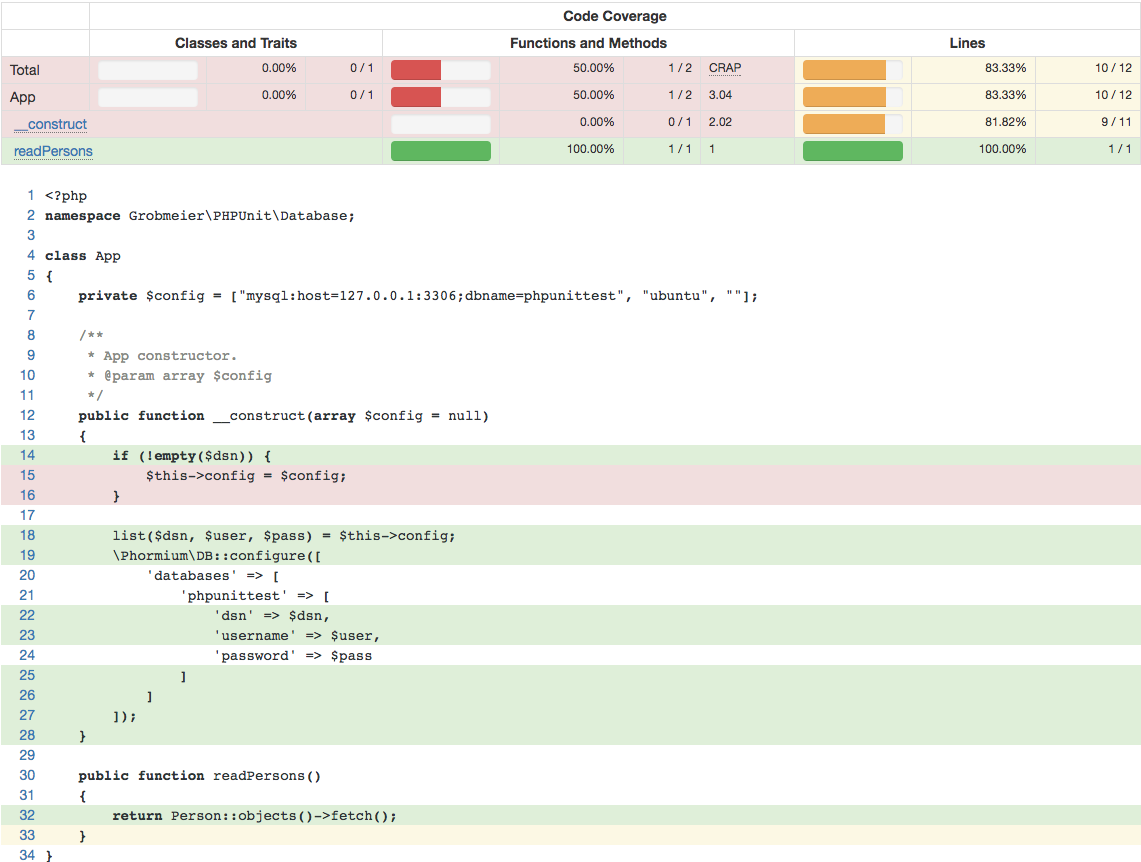
I never tested a specific part of my code! The unit tests did not cause this code to be executed, so it’s marked red. Time to reconsider either the code or to write more tests.
I recommend looking at this diagram regularly, at least weekly.
There are even tools to report automatically if the code coverage became worse over time. Plenty of opportunities!
Summary
This blog post aimed to introduce you to PHPUnit and unit testing in general. I hope I hit the target and you are now able to survive just by reading the specific docs. We talked about why you should test, the basics of PHPUnit, automated testing using CircleCI and even covered testing with databases.
There is a lot more, which doesn’t fit into a single blog post. It would be a full book, but seriously, there is no need for one. Unit testing is not really complicated once you get your kicks on the testing route. And in most cases, the official documentation helps you on your way.
If you still have questions or suggestions how to improve this article, please let me know.
And if you learned something useful by reading it, I am grateful if you would share it with your friends using Twitter, Facebook or something else.
Image Credits
- PHP Code: Luca Bravo. License: CC-0
Tags: #PHP #PHPUnit #Unit Testing #CircleCI #Code Coverage #Database testing #Mockery #Mock Objects